
Digital Punchcard Setup
Overview
The Digital Punchcard feature works in tandem with AlpineIQ (AIQ) to create a loyalty punch system in your mobile app. This tutorial will walk you through the complete setup process.
What You'll Need
Before you start, make sure you have access to your AlpineIQ admin panel.
You'll be creating three main components:
- AIQ Audiences for tracking progress
- Punch card graphics to display in the app
- AIQ reward/discount configuration
Step 1: Set Up Audiences for Each Punch
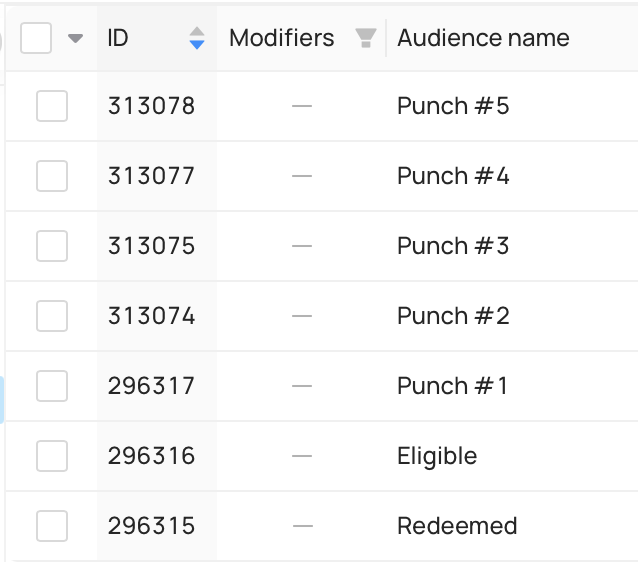
In your AlpineIQ dashboard, you'll create a separate audience for each punch in your punchcard, including two additional for the eligible and redeemed customer segments.
For example, if you're running a 5-punch card, you'll create 7 distinct audiences, as seen in the example below.
Refer to the guides below on setting up audiences according to type:
Setting Up a Points-Based Punch Card
Setting Up a Spend-Based Punch Card
Setting Up a Product/Brand/Category-Based Punch Card
Save the Audience IDs and their corresponding name (Punch #1, Eligible, ect), you will send these to us later.
Step 2: Create Graphics for Each Punch
Each audience (except ‘redeemed’) needs its own distinct graphic that will display in the app to show customer progress. These graphics should visually represent the punch level and make it clear how far along the customer is in earning their reward.
Design graphics that match your brand and clearly show progression. For instance, your Punch 1 graphic might show one circle filled in, Punch 2 shows two circles filled, and so on.
Make sure these graphics are properly sized for mobile display by using our typical in-app content guidelines as outlined here.
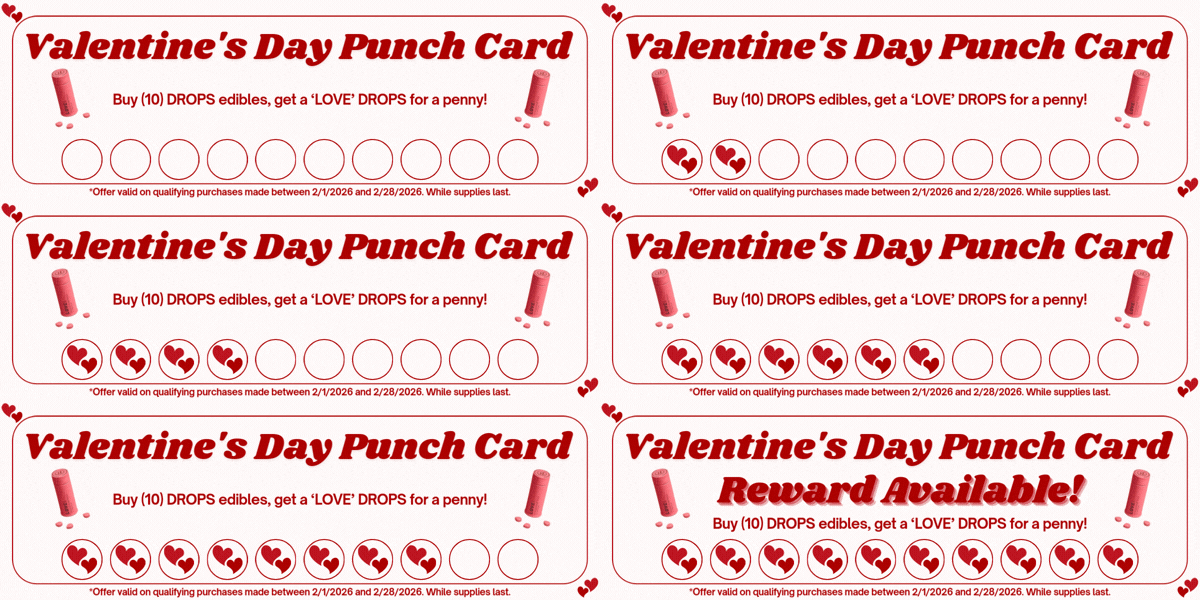
Save these graphics individually as you will be sending these to us later.
Step 3: Configure the Final Reward
Once you've set up all your punch levels, configure the reward that customers receive when they complete the punchcard. In AIQ, navigate to the Discounts section and create the offer that will be unlocked upon completion.
This could be a percentage discount, a dollar amount off, a free product, or whatever incentive you've chosen for your loyalty program. Make sure the reward is tied to the ‘redeemed’ punch audience so it triggers automatically when customers reach that level.
Note: Designate the discount available only to personas in the final punch audience. For example, if it is a 5-punch punch card, this would be the fifth punch audience.
Doing so avoids confusion, so that customers do not see the discount before they are eligible for it.
Step 4: Send Us the Graphics and Audience IDs
Once this is all complete, forward your account manager or support representative the following:
- Date which the punch card promotion begins and ends
- Audience IDs with the corresponding designation (e.g. Eligible - 123456, Punch #1 - 123457, Punch #2 - 123458, etc)
- Graphics for each punch stage
That's It!
Please forward the necessary materials no less than 7 days before the promotion begins, so we can implement the feature before it is live in your mobile app.
Customers will automatically progress through punch levels as they make qualifying purchases, and the app will display their current status with your custom graphics.
Don’t hesitate to reach out to support if you have any questions or need additional support!
Still need help?
Our support team is here for you.